Wednesday, February 29, 2012

Imaginary Fireplace

I decided that it would be fun to have a fireplace for them to imagine they were warm by the fire. I took a white piece of posterboard and went to town with a red marker to make a brick wall. My co-worker finished it off for me and added the dots to make it look more like real bricks. Then I added a piece of black posterboard and put a real picture of a fire centered on top of that. A few of the kids obviously have a fireplace at home because they went right up to it and rubbed their hands together and held their hands out towards the "fireplace." All of them like to sit on top of the climber and snuggle up next to the fire.


Saturday, February 25, 2012

Toilet Paper Snow

Last week we imagined it was snowing in the classroom. I took one toilet paper roll (yes, all of that is from just one roll) and separated all of the sheets. It takes about 5-10 minutes to separate all of the sheets, but it was extremely simple to do. Don't expect to be able to keep it afterwards, because it will be crumpled, crinkled, and much of it will have to be thrown out right away when the children inevitably lick it or wipe their little noses with it. :) And while it looks like a lot, clean up was super quick. The kids enjoyed helping to put it in the trash can, and the broom worked great to make a big pile we could just transfer right to the trash. Either way, it is extremely worth it. The kids had a fantastic time throwing the "snow" up in the air and trying to catch it...


And then they started getting the cars to drive through the snow...


And stuffing their shirts to see how much they could fit...


And filling up the dump-trucks and bulldozers.


We had so much fun with it, that we did it again the next day. This time, I provided cups and they all happily stuffed them, hoping to be the one to get the most pieces of snow in the cup.

Winter Collages

We made some Winter Collages last week. We fingerpainted on some foil that was attached to a blue piece of paper. Then attached lots of different white and blue collage materials, like feathers, cotton balls, pieces of yarn, pieces of pipe cleaners, etc. The kids just placed everything directly on the paint and it worked great. I was glad we used the fingerpaint, because tempera paint tends to peel off of smoother surfaces like foil. Here's a picture of one of the finished products.

What Do You See?

So for our Imagination theme, we decided to cover one of the shelf units with some inkblots. We thought it would be really interesting to see what the kids thought they were pictures of. I added a few colors by just putting some paint on a piece of paper and folding it over, creating a symmetry painting. The kids love them. Everyone agrees that the orange one looks like a butterfly, the bottom middle is a ballerina, and one of my little friends insisted that the purple one is a jacket. There were too many other declarations to count, so the kids really used their imaginations on these.


We used our other shelf unit to tie in to the Dramatic Play stage area. We added pictures we found online of different amounts of children on stages.


Who's in the Window? was Ms. Anita's great idea. We added foil so that it was almost like a mirror so they could imagine themselves in the big window frame and add pictures of the kids to find each other all around it. We always try to incorporate pictures of the children into things we are making because they have such a fun time finding themselves and naming all of their friends.

Imaginary Beings Board

As I stated before, February's theme is In My Imagination, so we decided to add a matching board to the room and made it about Imaginary Beings. It was very simple to make with just pictures that look realistic of imaginary beings, unicorns, giants, mermaids, etc. and some posterboard, contact paper, and velcro. Place it on a tri-board and let the kids go to town.

Valentine's Day Banner

So I am finally back and posting the picture I promised of the Valentine's Day banner. The kids loved how they had helped to create it with the cookie cutters in paint. Then I made a little sign for it and added pictures all around it of the children painting. The parents and the kids enjoyed being able to see them hard at work creating the banners that hung all around the room. We had a great party, ate lots of goodies, gave out valentines, and made glitter bottles with red food dye to take home.

Saturday, February 11, 2012

Valentine's Day

One of the few holidays we can celebrate at my center is Valentine's Day. So I really wanted to go all out. I found this project picture on pinterest. There's no website that it's linked to so I don't know where it came from, but I loved the idea. It was pinned for Mother's Day, but I figured it would be something fun and different to do for Valentine's Day instead of a typical heart. I can't wait to watch the kids handing them to their parents at our Valentine's Day party. Here's one of the completed projects:


We did make some hearts to make our banner. I will add some pictures of those once we put them up for the party. I had the kids dip heart and bow shaped cookie cutters in red paint and place them on different pink and purple papers. They had fun getting covered in paint. I cut the individual hearts out and put a hole in them to string them with yarn. Each heart is different, so the banners are really unique. They're also colorful and I'm sure they will look great.

Using Our Imaginations

For February, our theme is My Imagination. While it's a great theme, it can be a little difficult to come up with some ideas. I printer some full size pictures of different roads and contacted them onto a box. I put one picture on the wall and a little sentence strip that says "Imagine you are driving on this road." I placed the car that I made for last month in front of it and had the kids sit inside of the car and imagine they are driving on each of the different roads. 


Things That Go Projects

For Things That Go, we added things that go in the sky to our banner and hung some sky collages that the kids made to the bottom of the banner. You can cut out pictures from magazines or do what we did and print your own pictures out (our magazines are getting pretty thinned down lately).


We also made some cutouts of planes, had the kids color them in, and had them hanging in the corner.

Monster Truck Wheel Match

My co-teacher and I made this fun Monster Truck matching game. We took a box that was stuffed and covered with contact paper and added some pictures of monster trucks.  Then we printed the big pictures again and cut the wheels out, added some posterboard, contact paper, and velcro and Voila, a brand new game for the kids.


They had so much fun with this one and I think it worked really well with the pictures we chose because one side has a big wheel and a small wheel and the other side has a green wheel and a red wheel.

Sticky Wall

So this idea came from Teaching 2 and 3 Year Olds. I loved the idea of doing a sticky wall, so I used some black contact paper and taped it to the wall. At first the kids loved just touching it and sticking their hands to it, but then I brought out feathers, some bumpy coasters we had, and felt shapes. They had such a great time with this one and continue to play with it now. I replace the contact paper about once a week or whenever I notice that it's not quite as sticky anymore. The kids also had a fun time when I made a sticky floor for them one day. I just taped a 4 or 5 foot strip of contact paper sticky side up to the floor. They loved walking across and leaving prints from their shoes. What I didn't expect was the sound. It was LOUD every time they stepped on it and of course they loved that aspect of it.


Train Ticket Machine

My co-teacher made this awesome ticket machine for our train ride area. She used a box we had from when our co-worker made a gas pump, so it already had the hole cut out. She added some destinations on the front and on the sides we made little interactive matching games. 


On one side, there was a train match. Once again, it was just pictures printed from online, some posterboard, and contact paper. Then some velcro strips hot-glued on to both the background picture and the matching one.


We used the same technique and made some ticket matches. The ticket pictures are all from different countries.  We printed some other tickets and had them sitting in a wipes bin because the kids loved playing with the tickets.


Choo-Choo Train

For Things That Go, we made our Dramatic Play center into a train ride. I covered our kitchen set with black butcher paper and painted some wheels and windows on. We had a board that was put together at an angle and covered with black contact paper. We placed that in the front to give it a bit more of a train shape. Then I covered a box and a pringles can to make the smokestack. I cut out smoke shapes in butcher paper, stuffed them with paper, and stapled all around the outside. These were hung above the smoke stack. One of the kids asked what they were and I said it was smoke coming out of the train. He proceeded to tell me that it wasn't coming out of there, so I added a cup painted white to the top. He was so excited and yelled out "Look Ms. Liz, the smoke is coming out of the train."


Here's the other side of our big Choo-Choo. The kids really had fun playing on and around the train. They would roll trains and cars on top of it and liked feeling the crinkly paper.


We wanted to make the train interactive for the kids, so we added our texture board to one side of the front piece and made a "Choo-Choo Chalk Board" on the other side. This was so simple and the kids played with it daily. Since it was already covered in black contact paper, we were all set. So I just used some packing tape and attached some yarn. Then I tied the other end of the yarn to pieces of chalk and wrapped them with strips of packing tape. Make sure it is really secure on there because little hands will definitely be pulling. They will try to take the chalk everywhere else in the room.


Friday, February 10, 2012

Things That Go Games

Our matching game for Things That Go went over awesome. I printed pictures of different colored cars and contacted them with some posterboard. Then I contacted pieces of construction paper on the top of our shelf unit. We used a small box to hold the cars when they are not being used. Some kids loved matching the cars to the colors while others enjoyed just playing with the cars and making them go Vroom, Vroom.


My co-teacher made this fantastic Two's Twister board. Instead of a spinner, we have a box that has a picture on each side. Once the box is rolled, they will find the picture that it landed on and jump on the circle on the board. There are two of each so multiple kids can join in the fun.


This matching game was up on the wall and had pictures of things that go in the water. This one was made with pictures and posterboard, but I used clear packing tape instead of contact paper (we were running low on contact paper and waiting for the new shipment to come in). It's always good to know a back-up way to laminate things and it didn't take as long as I expected it to. It also looks a little different because it's clearer and shinier.


Things That Go

January's theme was Things That Go. Our two's absolutely LOVED this theme. Planes, Trains, and Automobiles. What can be better? Well, when I did the Grocery Cart for the food theme, I realized that the kids wanted to sit inside of the box more than push it around. So I decided to make a car and a bus for them to sit in. I took some big boxes and contacted them. I cut out posterboard to sit at the bottom and add a little color contrast. I used some cardboard to cut out steering wheels. Then I used metal fasteners to attach the steering wheels to a small piece of posterboard, then taped that posterboard to the inside of the box. The moving steering wheels were fun for a few days for them, but did not last long. I fixed them over and over, then finally just taped them to the box completely because once a couple of kids realized they could come off if they pulled hard enough, they pulled as hard as they could. Overall, these were a HUGE hit. They love sitting in them and having their friends push them around.


This project was my favorite for the Things That Go theme. I took pictures of each of the children standing up, holding onto the hooks underneath the cubbies. Then I printed them out and pictures of trolleys. I cut the children's pictures out and glued them onto the trolley picture to make it look like they were on the trolley. The kids LOVE seeing themselves in different things in the room and they get so excited to show Mommy and Daddy.


This was a poster we had up to show the difference between older and newer vehicles. It was great to see the kids try to wrap their heads around the fact that both pictures were cars or planes or boats. They would say "Car" pointing to the newer picture, then ask what the older car picture was.

The Three Bears

As I mentioned before, my center loves when we use real pictures. So when our library center was based on the three bears, I decided to make a tri-board matching game based on the book with real pictures. The bowls, chairs, and beds are all matching. The bears are attached to the board. I used the same pictures for each one, but just changed the sizes. Since our twos are still learning sizes, I decided to outline each picture with a black line so that matching would be a little less complex for them. Some of them did a great job understanding the difference between each of the bowls. They loved taking the pictures off of the board and putting them in piles of bowls, chairs, and beds. Then, they would put them back up in their spots. 


Winter Fun

For winter, I covered a table with butcher paper and cut some snowmen bodies out of posterboard. I printed out some pictures of scarves and hats and cut them out. Then put them on some posterboard and contacted them. I used velcro strips and made it so that the children could take off the hats and scarves and mix and match them. They really love being able to switch everything out and when they put the scarves on the head and hats on the neck they giggle about how silly it looks.


The mitten match has been a big success. My friends like to take all of the mittens off, carry them around in one of the purses or bags we have in our room and then come back and put them all back. One mitten from each pair is on the posterboard, while the other one is done with posterboard and contact paper and has velcro on the back. We use velcro a lot and while it sticks very well, my twos tiny fingers manage to peel it off over and over. I've found that hot gluing the velcro lasts much longer. It's still not two-proof since they manage to peel them off every once in a while, but without it they peel everything off in minutes.

Food

For our food month (December), I decided to try and combine the theme and the season by making a food snowman. The children had a great time counting how many pieces of each food were in the snowman. It's hard to see them, but I have little numbers stuck onto each of the pieces to help them while they count. 


This velcro matching game teaches the twos about the different food groups. They really loved pointing to the different things that they knew the names of in each picture.


This frying pan was made with about 4 paper plates, some craft sticks, a spoon, glue, tape and contact paper. It actually lasted for about 2 months and was really simple to make. I cut about 6 slits on the grooved part all around the outside of the plates. Then I overlapped the pieces to make the sides stand up a bit more. I taped that all together then cut most of the spoon off of the handle. I hot-glued the small bit of spoon left to the top of the plate to make a handle. I glued some craft sticks to the handle to make it thicker, then wrapped the handle in tape. I used a marker to color the handle black and covered the plates with red contact paper.


This food chute was the hit of the month. The children could not get enough of it. My center got new rugs and we saved the tubes that the rugs came on. I contacted the tube yellow and taped it to a table at the top and to a basket at the bottom. I also taped the basket to the floor so the kids couldn't just pick it up and run with it. Then I added a few of our plastic foods. It was so much fun watching the kids drop food down the chute and be amazed when it came flying out of the bottom.


We kept the Maize Maze out on the Science/Sensory table for the food month as well as the farm one. As you can see, it needed to be fixed up a couple of times, and we also switched the construction paper out for a real picture of corn. We added a Noodle bin with different kinds of raw noodles as well. It was great having it in a wipes bin because the kids would stick the noodles through the hole in the top.

Grocery Store

December was our Food theme month.  Our dramatic play area went from Farmer's Market to a Grocery Store. We made this sign for the Aisles and added some pictures so that our twos could understand what it said. We also asked parents for any empty food boxes they had. We stuffed them with paper and taped them shut and left them in our kitchen set cabinets. By the end of the month, we had about 30 different food and drink boxes. 


We updated our Farmers Market with real pictures contacted with some posterboard so that they would last a little longer. Our center really pushes us to use real pictures whenever we can. They look better and are more educational for the children. It was also good having the real pictures because then I could add a picture to each pocket so the children can see where each food belongs.


We added a meats and dairy section for the grocery store and some pictures for each one. We left some grocery bags out for the children to shop for their groceries. 


We also decided to make a grocery cart. I used a big box, contacted it, drew lines on it, and added some wheels to it. I made the wheels roll at first by sliding the wheels onto some paper rolls that were glued onto the bottom of the box and hot gluing some paper bowls on the end. They didn't last long though so I ended up taping the wheels up onto the box. The kids could still push it around and fill it up. 


Farmer's Market


For our Farm month, we turned Dramatic Play into a Farmer's Market. My co-teacher cut out shapes of different fruits and veggies and made labeled pockets for them. We used some fishing line and hung them up to the hooks that we have there but the pockets could probably be placed directly on the wall. The kids loved taking out and putting away the different foods.


We also had a cash box for the Farmers Market. I used a shoe box that was attached on one side so it could be opened and closed easily. I contacted it, then cut a hole in the top. Then I used some construction paper, cardboard, and contact paper to make some large dollar bills and coins. I made about 5 coins and 5 bills. The kids had a great time putting the money in the cash box and counting how many different "moneys" they had.

Down On The Farm

For our Farm theme, I decided to have the kids draw some fences around a field. I printed out multiples of a picture of some cows on a field and glued them onto half sheets of construction paper. Then I brought out some red markers and showed the children how to draw AROUND the field. I was really surprised by how awesome they did. Almost all of them did it without any assistance.


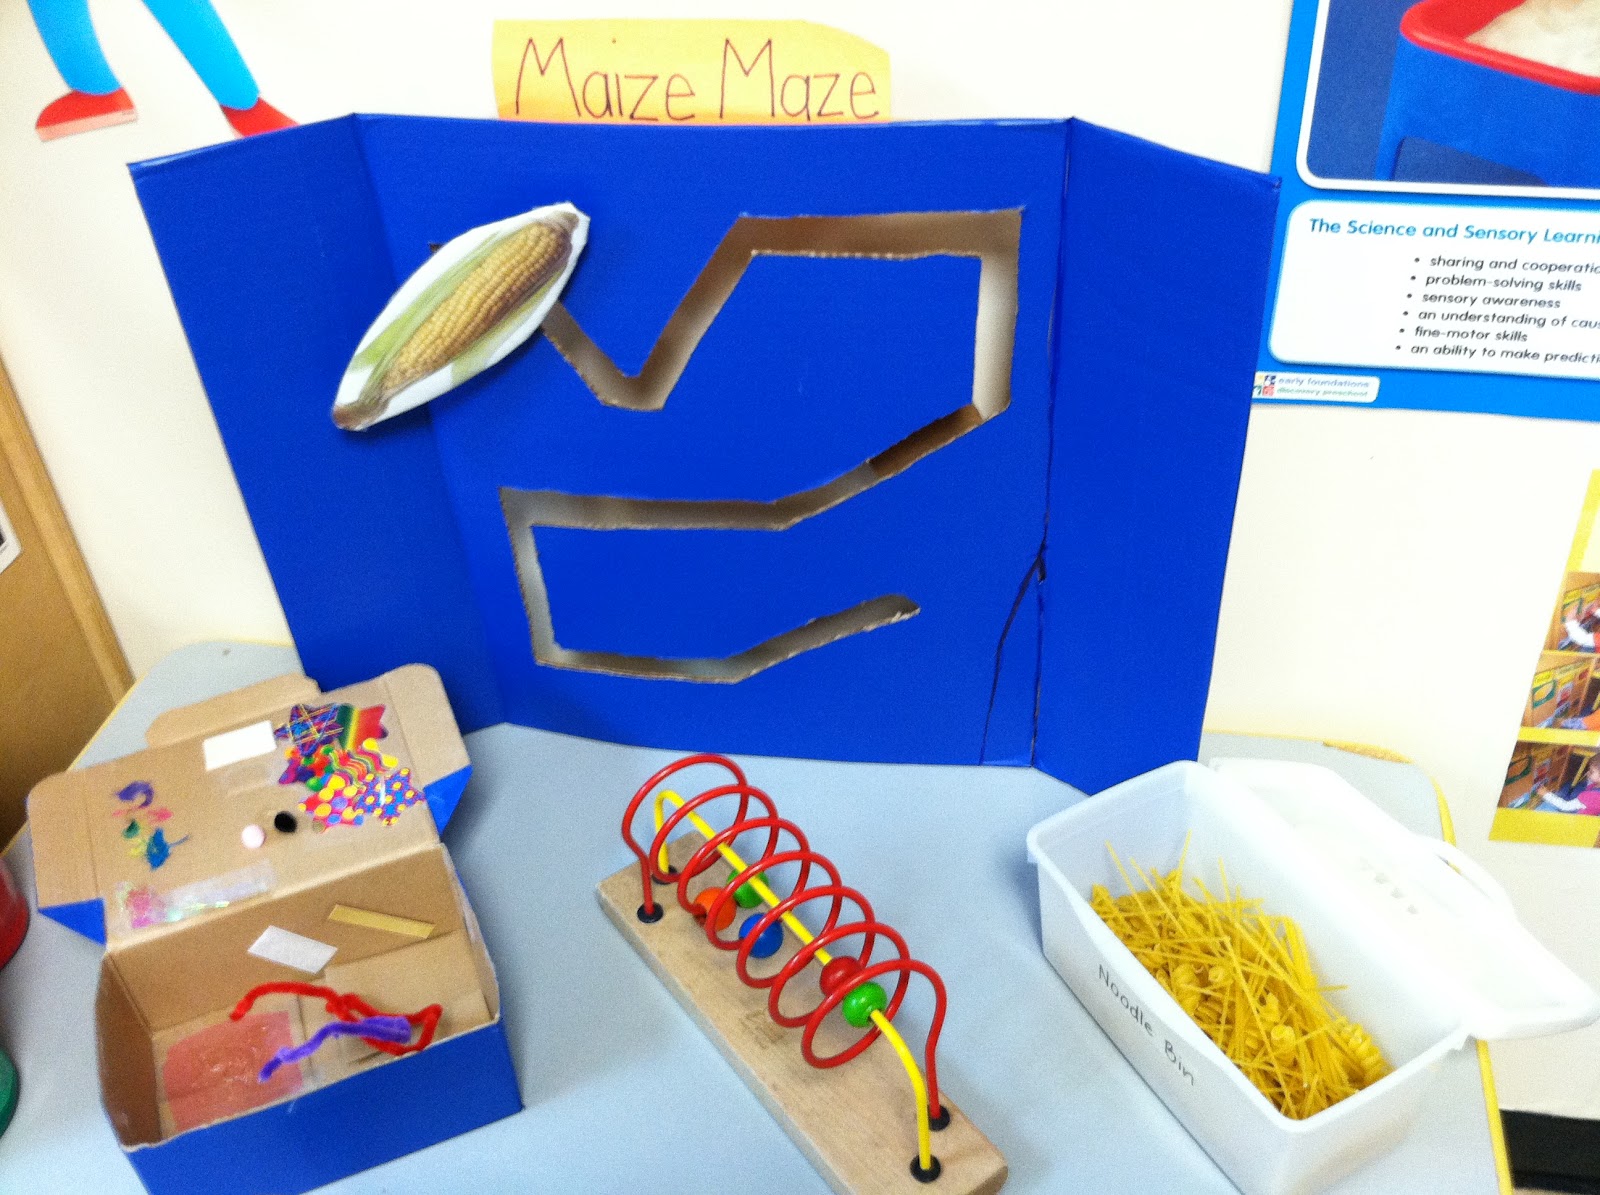
In this picture, there are two projects. First, the Maize Maze, was a board I contacted and cut out to make a maze. Then I used some construction paper, cardboard, and contact paper to make the piece of corn. I hot glued a piece of cardboard to the back of the corn, put it through the maze and hot-glued it to a wide piece of cardboard in the back. This one was a little more difficult to make, and needed to be fixed multiple times since some of the kids were trying to pull the corn towards them instead of through the maze. The kids loved it though, so it was worth the extra time put in. The poster was a fun one my co-teacher made about the different colors pumpkins can be. It was a matching game with velcro.


One of the art projects we did for the Farm month was basket weaving. The kids had a great time. I used large construction paper in pink and white and cut it into strips about 2 inches thick. I started the weaving for them and used a glue stick to hold the pieces together. When I sat them down, I pointed to certain strips and had them lift them up or lay them down. I wasn't sure how they would do with this one because it was a little complex, but it actually worked really well. They needed direction the whole time and they didn't quite grasp what I was asking them to do, but once they got started they really loved what they were creating. Once they finished I folded them into the baskets and added the handles. I took some pictures of them weaving and then took some pictures while they were playing with the baskets and placing our plastic food inside of them. We hung them up with the pictures above our dramatic play area and eventually sent them home.


This was a fun take on a typical matching game. I got this idea from one of my co-workers. I printed out two pictures of each type of farm equipment. I contacted a picture down onto the table, then cut the second picture in half. I used just one half of the picture for the children to match down. In her room with her three year olds, she just used one picture and had the children match the halves, but for my twos who are still learning how to play matching games, I figured simpler would be better.


On the back of our library, I set up this little game for the children. They had so much fun finding which animal was at the end of each of the prints. It was really simple to put together too. All I had to do was print out a few pictures, cut out the prints so they could overlap and contact it all down.


For our library center, I made these little booklets. The kids had so much fun counting 1 egg, 3 eggs, and 5 eggs depending on which one they opened. A picture of a chicken contacted onto a piece of posterboard on top, and a picture of different amounts of eggs contacted onto cardboard on the bottom. I like to cover the whole thing in clear contact so that they last for a much longer time. I then took two 2 inch by 4 inch contact paper strips and put one on the outside and one on the inside to hold the two halves together.